Stay awhile and listen… WireGuard is a simple yet fast and modern VPN that utilizes state-of-the-art cryptography. It’s easier to configure than most VPNs and aims to be more efficient and secure. This post will show you how to set up WireGuard VPN on Linux operating system (Ubuntu), explain the configuration options, and how to enable communication between WireGuard clients.
What is WireGuard?
WireGuard is an extremely simple yet fast and modern VPN that utilizes cryptography like the Noise protocol framework, Curve25519, ChaCha20, Poly1305, BLAKE2, SipHash24, HKDF.
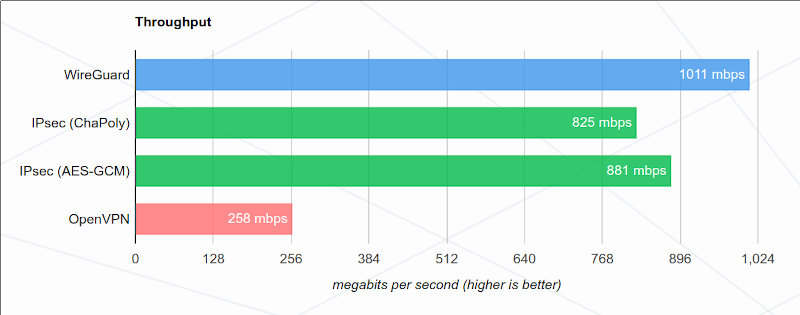
It aims to be faster, simpler, leaner, and more useful than IPsec and more performant than OpenVPN.
WireGuad shows pretty interesting performance charts compared with its pairs.

You can find great info at www.wireguard.com.
Installing WireGuard
WARNING: Messing around with network configuration may lead to inaccessible servers and workstations. Try these settings in a test environment. Proceed at your own risk! Read the full disclaimer here.
Update Your System
I’m using Ubuntu Linux to write this post and execute the commands. You should adapt the commands to your Linux flavor.
sudo apt update -y && sudo apt upgrade -yInstall WireGuard
sudo apt install wireguard -yVerify Installation
sudo wg --versionThe command above should return something like this:
wireguard-tools v1.0.20200513 - https://git.zx2c4.com/wireguard-tools/Generating Keys
WireGuard uses public and private keys for authentication. You need to generate these keys for both the server and clients.
# Generate server private key
wg genkey | sudo tee server_private.key

# Generate server public key
sudo cat server_private.key | wg pubkey | sudo tee server_public.key
All clients must generate each key, so repeat the process for your clients to generate their keys.
Configuring the Server
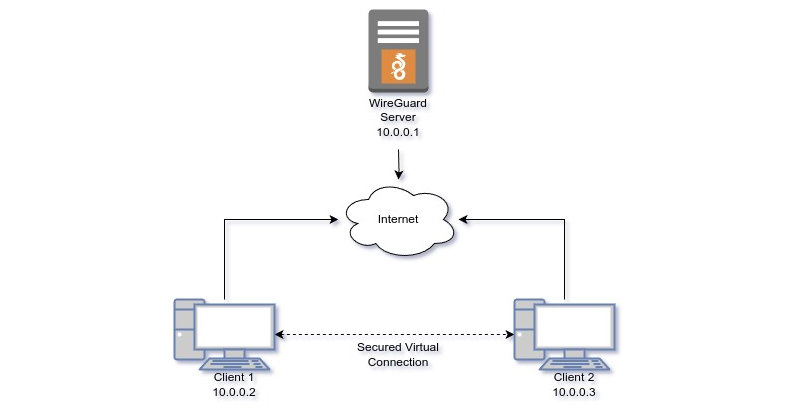
I’ll assume the configuration below: a WireGurd server and two clients connected to the internet. The example server can be reached by the name (DNS) “my-wiregurd-vpn-server.mydomain.com” at port 51820.
Configuration File
Create a configuration file for the WireGuard interface. By default, WireGuard interfaces are named wg0, wg1, etc.
sudo nano /etc/wireguard/wg0.confAdd the following configuration:
[Interface]
Address = 10.0.0.1/24
PrivateKey = <server_private_key>
ListenPort = 51820

[Peer]
# Client 1 configuration
PublicKey = <client1_public_key>
AllowedIPs = 10.0.0.2/32

[Peer]
# Client 2 configuration
PublicKey = <client2_public_key>
AllowedIPs = 10.0.0.3/32
Configure the system to forward IP packages:
sudo sysctl -w net.ipv4.ip_forward=1Configuring the Clients
Each client needs its own configuration file. For example, on Client 1:
sudo nano /etc/wireguard/wg0.confAdd the following configuration:
[Interface]
Address = 10.0.0.2/24
PrivateKey = <client1_private_key>

[Peer]
PublicKey = <server_public_key>
Endpoint = my-wiregurd-vpn-server.mydomain.com:51820
AllowedIPs = 0.0.0.0/0
PersistentKeepalive = 25
You must change the host and port to match your configuration.
The Client 2 configuration differs only in PrivateKey and Address which must be unique to each client.
Starting WireGuard
Start the WireGuard service on both the server and clients.
sudo wg-quick up wg0Enable WireGuard to start on boot:
sudo systemctl enable wg-quick@wg0Check if the clients are connecting with:
sudo wgYou should get something like this:
interface: wg0
  public key: <server_public_key>
  private key: (hidden)
  listening port: 51820

peer: <client1_private_key>
  endpoint: <client1_public_ip_address>:26125
  allowed ips: 10.0.0.2/32
  latest handshake: 58 seconds ago
  transfer: 92.96 KiB received, 80.39 KiB sent

peer: <client2_private_key>
  endpoint: <client2_public_ip_address>:21564
  allowed ips: 10.0.0.3/32
  latest handshake: 55 seconds ago
  transfer: 418.99 KiB received, 139.12 KiB sent
If not, check if the WireGuard service is running and journal for errors.
Allowing Clients to Communicate (optional)
Sometimes it is a must to allow clients to communicate with each other through the VPN, although bringing a pinch of insecurity to the VPN.
The server’s firewall rules will be changed to ensure network traffic between the clients.
I’m using iptables as my firewall. To set up the iptables rules run this command:
sudo iptables -A FORWARD -i wg0 -o wg0 -j ACCEPTThis command is telling iptables to append a forward rule to accept traffic which is coming from the device wg0 and is going to the device wg0.
Make these changes persistent typing:
sudo apt install iptables-persistent
sudo netfilter-persistent save
Or you can change the server’s wg0.conf and add these lines in bold to run after WireGuard goes Up and Down:
...
PrivateKey = <server_private_key>
ListenPort = 51820

# Enable communication between clients
PostUp = iptables -A FORWARD -i wg0 -o wg0 -j ACCEPT
PostDown = iptables -D FORWARD -i wg0 -o wg0 -j ACCEPT

[Peer]
# Client 1 configuration
PublicKey = <client1_public_key>
...
Testing the Connection
On each client, verify that you can ping the other clients through the VPN.
ping 10.0.0.2  # From Client 2 to Client 1
ping 10.0.0.3  # From Client 1 to Client 2
If everything is set up correctly, the clients should be able to communicate with each other securely through the WireGuard VPN.
If you cannot ping from clients, try to ping the server (10.0.0.1). Clients must ping the server! If it’s not pinging, check the firewall.
Conclusion
Following this post, you’ve set up WireGuard VPN on Linux operating system. WireGuard offers a secure and efficient way to connect multiple devices over a VPN. By following this guide, you can ensure secure communication between your devices with minimal setup and configuration.
See ya!