Building and deploying a high-performance, maintainable API can be a complex task, especially when you need to manage infrastructure, handle scaling, and ensure robust security. In this guide, I’ll show a modern approach to running a .NET serverless API on an AWS Lambda function. In this post, you’ll learn how to scaffold a minimal .NET project, implement your business logic in a clean, testable handler, and bundle it all into a Docker image that runs on Lambda’s highly scalable platform.
Why Choose a Serverless API on AWS Lambda
Here are some motivations to build such an API to run on Lambdas, at least the ones I think are more important.
Operational Simplicity
With AWS Lambda, you offload server management entirely, there are no EC2 instances to patch, no operating systems to update, and no capacity planning to worry about. AWS handles the underlying infrastructure, so you can focus on writing your code.
Automatic Scaling
Lambda automatically scales your API in response to incoming traffic: when requests surge, AWS transparently spins up more function instances; when traffic drops, it scales back down to zero. This elasticity ensures consistent performance under varying loads without manual intervention.
Cost Efficiency
You pay only for the Lambda running time you use. Lambda’s billing model is metered in 100 milliseconds, meaning idle periods don’t cost you money. For APIs with intermittent or bursty traffic patterns, this “pay-as-you-go” pricing can deliver significant savings compared to EC2 servers.
Fast Deployment and Iteration
Container images give you full control over your runtime environment: bring in custom libraries, frameworks, or native dependencies, and be confident that what runs locally is identical to what runs in production. Pushing a new Docker image to ECR and updating your Lambda function can be automated in CI/CD pipelines for fast deployment of releases.
Deep AWS Ecosystem Integration
Lambda functions integrate natively with other AWS services, such as Amazon DynamoDB, S3, SNS, and so on, enabling you to build powerful, event-driven architectures with minimal glue code. API Gateway further enhances this by providing caching (when needed), request validation, throttling, and WAF protection right out of the box.
Prerequisites
You need an AWS account with CLI credentials set (aws configure).
Install .NET 8 and the Lambda .NET Global Tool.
Install Docker to build and test your container locally.
Creating the Lambda Project
I’ll build the code example over the lambda templates provided as a template package. You can install it with this command:
dotnet new install Amazon.Lambda.TemplatesThis adds the AWS Lambda project templates to your .NET CLI
Use the following command to list the installed templates:
dotnet new listThis should print a bunch of templates like this:

I’ll use the template called: “Lambda ASP.NET Core Web API (.NET 8 Container Image)” or “serverless.image.AspNetCoreWebAPI”.
Scaffold a Container-ready API
Now let’s create the template project running this command:
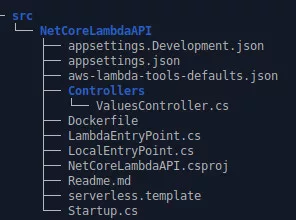
dotnet new serverless.image.AspNetCoreWebAPI --name "NetCoreLambdaAPI" --region us-east-1This creates a NetCoreLambdaAPI/src/NetCoreLambdaAPI directory containing the source code.
Implement Your API
Now you can implement your .NET API as you normally do. You don’t need to make special code to run as AWS Lambda.
I’ll use the default template code and change small bits as an example.
using Microsoft.AspNetCore.Mvc;

namespace NetCoreLambdaAPI.Controllers;

[Route("api/[controller]")]
public class ValuesController : ControllerBase
{
    // GET api/values
    [HttpGet]
    public IEnumerable<string> Get()
    {
        return new string[] { "value1", "value2" };
    }

    // GET api/values/5
    [HttpGet("test")]
    public string Test(string input = "no input")
    {
        return input.ToUpper();
    }

    // POST api/values
    [HttpPost]
    public void Post([FromBody]string value)
    {
    }

    // PUT api/values/5
    [HttpPut("{id}")]
    public void Put(int id, [FromBody]string value)
    {
    }

    // DELETE api/values/5
    [HttpDelete("{id}")]
    public void Delete(int id)
    {
    }
}
Containerize the Function
I don’t like the default Dockerfile provided with the template, so I changed it a little bit to turn it into this:
FROM public.ecr.aws/lambda/dotnet:8 AS base

FROM mcr.microsoft.com/dotnet/sdk:8.0 AS build
WORKDIR /src
COPY [".", "NetCoreLambdaAPI/"]
WORKDIR "/src/NetCoreLambdaAPI"
RUN dotnet build "NetCoreLambdaAPI.csproj" --configuration Release --output /app/build

FROM build AS publish
RUN dotnet publish "NetCoreLambdaAPI.csproj" \
--configuration Release \
--runtime linux-x64 \
--self-contained false \
--output /app/publish \
-p:PublishReadyToRun=true

FROM base AS final
WORKDIR /var/task
COPY --from=publish /app/publish .

CMD [ "NetCoreLambdaAPI::NetCoreLambdaAPI.LambdaEntryPoint::FunctionHandlerAsync" ]
Want to know more about Docker? Check these posts: Deploying a Docker Service Stack and Set up Datalust Seq in a Docker Container
This Dockerfile uses the official .NET SDK Microsoft builder image (mcr.microsoft.com/dotnet/sdk:8.0) to build the API but it creates a running image with the official optimized AWS Lambda image (public.ecr.aws/lambda/dotnet:8).
Another important part of this Dockerfile is the last line, the CMD section. This string should point to the special method used to load the correct Lambda handler. My CMD points to: NetCoreLambdaAPI::NetCoreLambdaAPI.LambdaEntryPoint::FunctionHandlerAsync
This path can be read as: ProjectName::MainWorkspaceName.LambdaEntryPoint::FunctionHandlerAsync. The LambdaEntryPoint class is provided by the template and FunctionHandlerAsync is the name of the entry method provided by the super class.
Build and Test Locally
To build and run your code, type the following commands in the terminal:
docker build -t net-core-lambda-api:dev -f Dockerfile .
docker run -it --rm -p 9000:8080 net-core-lambda-api:dev
These commands should build your image and TAG it as net-core-lambda-api:dev and run a container exposing the port 9000 (TCP).
When the container runs, it expects some input, and the terminal should show some output like:
29 May 2025 17:59:29,934 [INFO] (rapid) exec '/var/runtime/bootstrap' (cwd=/var/task, handler=)To test your API, just run:
curl -X POST "http://localhost:9000/2015-03-31/functions/function/invocations" -d '{
  "resource": "/{proxy+}",
  "path": "/api/values/test",
  "httpMethod": "GET",
  "queryStringParameters": {
    "input":"this is a simple test input"
  }
}'
The test URL seems weird because we did not write any code to generate this URL, nor this kind of input body, but remember that Lambda runs in a different environment. The AWS Lambda environment expects this body to proxy the request to your API.
This request should return something like this:
{
   "statusCode":200,
   "headers":{

   },
   "multiValueHeaders":{
      "Content-Type":[
         "text/plain; charset=utf-8"
      ]
   },
   "body":"THIS IS A SIMPLE TEST INPUT",
   "isBase64Encoded":false
}
The response indicates that the API is working as expected.
It’s also possible to run the API locally without using the Lambda entry point. You just need to do the usual way: running dotnet run
Push the Image to Amazon ECR
Create ECR Repository
aws ecr create-repository --repository-name net-core-lambda-apiEnsure your IAM user/role has ecr:CreateRepository and ecr:PutImage
Authenticate Docker to ECR
aws ecr get-login-password | docker login --username AWS --password-stdin <aws_account_id>.dkr.ecr.us-east-1.amazonaws.comThis logs Docker into your private ECR registry
Tag and Push
docker tag net-core-lambda-api:dev <aws_account_id>.dkr.ecr.us-east-1.amazonaws.com/net-core-lambda-api:dev
docker push <aws_account_id>.dkr.ecr.us-east-1.amazonaws.com/net-core-lambda-api:dev
The API image will now be available for Lambda deployment.
IAM Permissions
Execution Role for Lambda
Create an IAM role lambda-exec-role with this trust policy for the Lambda service. Then, attach a policy allowing:
{
  "Version": "2012-10-17",
  "Statement": [
    {
      "Effect": "Allow",
      "Action": [
        "logs:CreateLogGroup",
        "logs:CreateLogStream",
        "logs:PutLogEvents"
      ],
      "Resource": "arn:aws:logs:*:*:*"
    },
    {
      "Effect": "Allow",
      "Action": [
        "ecr:GetDownloadUrlForLayer",
        "ecr:BatchGetImage",
        "ecr:BatchCheckLayerAvailability"
      ],
      "Resource": "*"
    }
  ]
}
This grants CloudWatch Logs and ECR pull permissions to your function.
API Gateway Invoke Permission
API Gateway must be allowed to invoke your Lambda. After creating the function, run:
aws lambda add-permission \
  --function-name NetCoreLambdaApi \
  --statement-id apigateway-invoke \
  --action lambda:InvokeFunction \
  --principal apigateway.amazonaws.com \
  --source-arn arn:aws:execute-api:us-east-1:<aws_account_id>:<api_id>/*/*/*
This manually grants apigateway.amazonaws.com the right to invoke your function. You could also do the same thing using the AWS Lambda panel.
Create the Lambda Function
aws lambda create-function \
  --function-name NetCoreLambdaApi \
  --package-type Image \
  --code ImageUri=<aws_account_id>.dkr.ecr.us-east-1.amazonaws.com/net-core-lambda-api:dev \
  --role arn:aws:iam::<aws_account_id>:role/lambda-exec-role
This spins up a Lambda function using your container image.
Configure API Gateway
Create an HTTP API
aws apigatewayv2 create-api \
  --name "NetCoreLambdaApi" \
  --protocol-type HTTP \
  --target arn:aws:lambda:us-east-1:<aws_account_id>:function:NetCoreLambdaApi
This creates an HTTP API that forwards all requests to your Lambda.
Deploy a Stage
aws apigatewayv2 create-stage \
  --api-id <api_id> \
  --stage-name prod \
  --auto-deploy
Your API is now live at https://.execute-api.us-east-1.amazonaws.com/prod
Test the Endpoint
Send a POST to your API:
curl -X GET https://<api_id>.execute-api.us-east-1.amazonaws.com/prod/api/values/test?input=hello \
     -H "Content-Type: application/json"
You should get a response code OK (200) with the word HELLO.
Conclusion
In this guide, I’ve shown how to build and pack a C# API as a containerized AWS Lambda function using the .NET Lambda image template and Docker to ensure a consistent runtime environment across development and production. The API Gateway integration exposes your Lambda via a managed HTTP endpoint with built-in throttling, caching, and request validation, protecting your backend and improving performance.
See ya!